|
|
Preview |
|
|
Preview |
Here is a quick and dirty screen shot of OnyX. It was taken on an 1024x768 screen. However, OnyX was originally developed on a 640x480 screen. So those with smaller terminal, don't freak :) I know how ya feel. When I get done it should still work on a 640x480. My color depth is also currently at 16 bits.
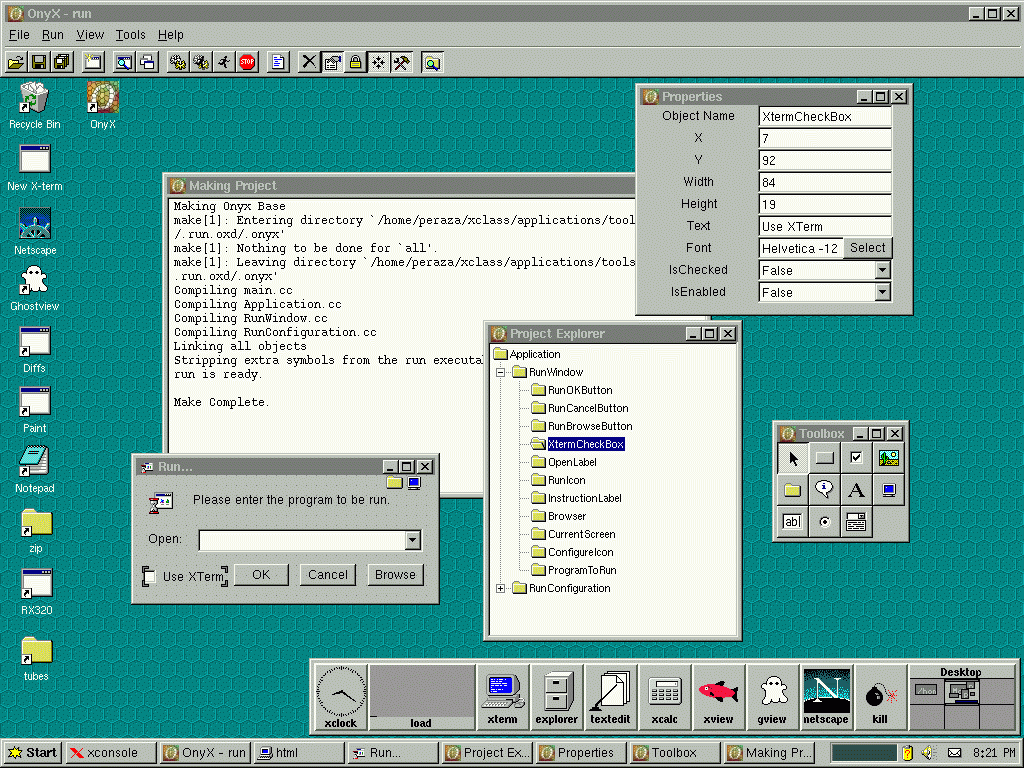
What you are seeing here is the several windows that OnyX uses. They do not have to be visible all of the time, with the exclusion of the top one. I use these for this demonstration. There are several other less used windows that are not shown here. (The Menu Editor, for example.)
This is a picture development of a run program similar to the one distributed with Xclass. It is of course the window named "Run...". It is not really running because it is being modified. In other words, OnyX has full control over that window.
Although you cannot see it, the mouse is on the check box in "Run...". You should be able to see the small brackets on the corners, I was currently resizing/positioning that box. You can also see several other objects in "Run...". They are, clockwise from the top left: an icon, a label, a open/save file dialog control, a screen information control, a drop box, three buttons, a check box, and another label. The screen information control and open/save file control are displayed as icons since their look is not modifiable. In fact, the screen information control is never displayed in a running process. It just relays the attributes of the screen.
To the right of the "Run..." window can be seen the "Project Explorer". The RunWindow folder has been opened and the XtermCheckBox has been selected. This matches what is being done in the development window. Indeed, the development windows, the project explorer, and the properties window should all stay in sync automatically. By scanning the list you should be able to match the names with the objects in the "Run..." window. By now you may have noticed the "Application" entry in the project explorer. This is not a window, but instead will eventually include properties to affect the whole application, i.e.: author, version, company, etc. Underneath RunWindow you can see RunConfiguration. This is a additional window in the project that has its own objects attached to it.
Above and to the right of the "Project Explorer" you can see the "Properties" window. As you can notice it is showing the properties of the check box in "Run...". If you are concerned about the "Properties" window being too thin, don't be. Resizing the window will show more space to enter property values.
Below and to the right of the "Project Explorer" is the "Toolbox" window. Just like its name suggests it is a toolbox. (Had to state that just in case any Microshaft programmers happen to stumble on this page. And no, I don't mean Visual Basic/C++/Java people. I mean those people who work for Bill and made that operating system you are about to reboot because it has a half life of 30 minutes. *grin*) You can see a few of the various tools available. Right now the object selection tool/button is selected. OnyX will have its core OnyX tools and it will allow for user created tools as well. So if you don't like something, just build a better one and go with it. Since the tools you use are distributed as a part of the final program, there shouldn't be any conflicts.
The tools shown in the toolbox are not the complete set. There are several more available and the list is growing all of the time. The size of the toolbox is not forced. You can resize the toolbox and it will automatically adjust the buttons to fill it up in the most appropriate way possible. Then, it will resize itself to trim off the extra space. I have it in the rectangular shape for this demonstration so that the name would be visible. Normally I prefer a 3xWhatever configuration.
Behind those four windows is the OnyX make window. It is named "Making Project". I did a quick build here so you can see that I am trying to keep everything non command line based. In other words, no XTerms. While I like XTerms, it just doesn't seem like a GUI to me if I am forced to use them. Thus, the project build is completely viewed in the OnyX environment.
Side note: while eventually I hope/wish to have an OnyX code editor, right now all I do is shell off to 'pico'. Alas, there is that darned XTerm again. I'll get that taken care of eventually, though. Of course, one of the features you have in OnyX is the selection of your own editor. So you can use the OnyX internal editor, pico, or anything else. All you emacs fans can cheer now. :)
Note: you can now use the notepad program that comes with the xclass distribution for a more consistent look and feel. Notepad did not exist at the time OnyX was first written. --Hector.
And finally, at the top of the screen, is the main "OnyX" window itself. This is the only one that has to keep running during the whole process. You can minimize/resize/move it, of course. Just don't close/kill it. The toolbar is being constantly extended as more functionality is added. The purpose of the buttons, from left to right, is: Open Project, Save Object, Save Project, Add New Window, View Window, Next Window, Make, Make and Run, Run Program, Stop Program, Show Code, Delete Control, Show Properties, Lock Controls, Snap To Grid, Show Toolbox, and the Project Explorer.
Well, that's a small walk through. I'll expand this a little more later.
